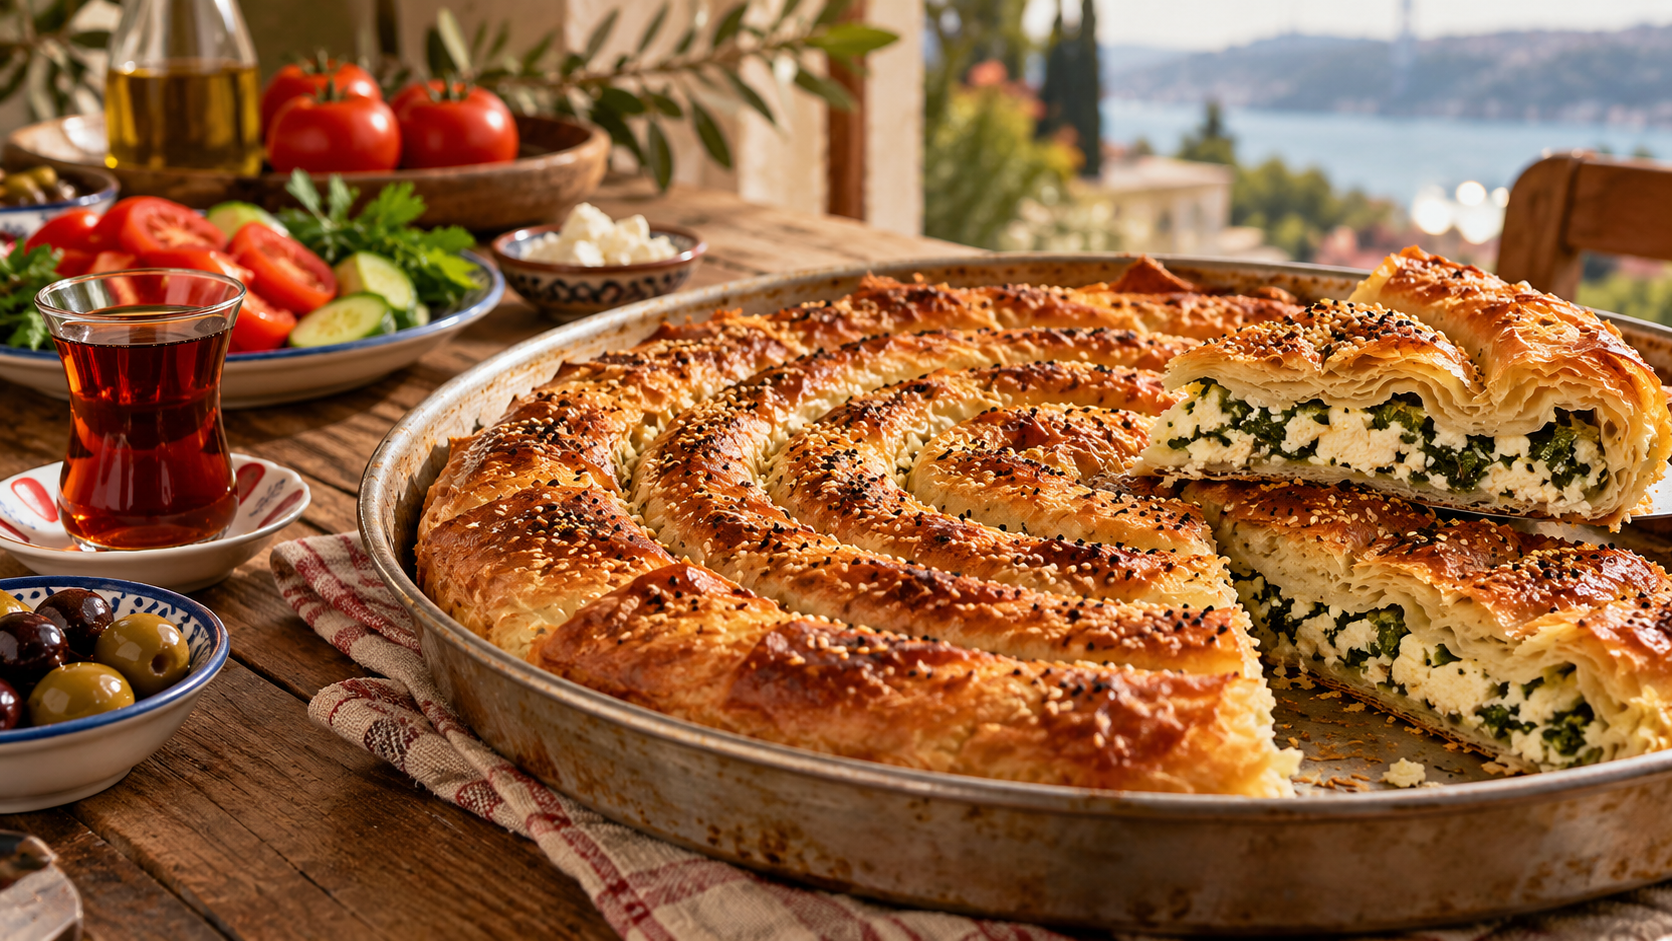
Traditional Homemade Cheese Borek
Turkish Kol Boregi Recipe brings together thin, hand-rolled dough, a savory cheese-and-parsley filling, and a beautifully golden spiral crust. This traditional Turkish pastry, known as kol böreği, is made by rolling homemade dough into long filled ropes and arranging them in a baking tray. Unlike shortcut versions made with packaged puff pastry, this recipe starts with a simple, yeast-free dough that is rested, stretched, buttered, and rolled by hand. Follow the detailed instructions to create a crisp exterior, tender inner layers, and evenly distributed cheese filling without relying on store-bought pastry.
Table of Contents
- What Is Turkish Kol Böreği?
- Why You’ll Love This Recipe
- Ingredients
- Ingredient Notes & International Substitutions
- Equipment
- Step by Step Instructions
- Expert Tips
- Regional Variations
- Common Mistakes
- Serving Suggestions
- Storage & Reheating
- Frequently Asked Questions
- Conclusion
What Is Turkish Kol Böreği?
Kol böreği is a Turkish savory pastry made from long rolls of thin dough wrapped around a filling. The Turkish word “kol” means “arm,” a reference to the pastry’s elongated shape.
Instead of stacking flat sheets, the cook distributes the filling along the dough, rolls it into a long rope, and arranges it in a baking tray. Depending on the preparation, the ropes may be placed in straight, parallel rows or wound into one large spiral.
The result is a pastry with a browned exterior and multiple thin layers around its filling. Cheese, spinach, potatoes, and seasoned minced meat are common choices.
Kol böreği in international food references: TasteAtlas describes kol böreği as a Turkish savory pastry recognized for its long, arm-like form and spiral presentation. Its overview also identifies cheese, spinach, potatoes, and minced meat among possible fillings. The description reflects the pastry’s culinary identity, rather than prescribing one definitive dough recipe. Traditional hand-rolled preparations remain distinct from convenient versions made with commercially prepared puff pastry.
In the TasteAtlas list titled “Top 11 Turkish Savory Pastries,” updated August 15, 2026, kol böreği appeared in second place. Because such rankings depend on changing audience ratings, they should not be interpreted as a permanent classification of Turkish cuisine.
This recipe uses a homemade, yeast-free dough divided into six portions and rolled into six thin sheets. Each sheet is coated with butter, filled with cheese and parsley, and shaped into a long roll. The six rolls are arranged in a continuous spiral and baked.
It is an adaptation of documented hand-rolled Turkish börek techniques, not a claim that every Turkish household prepares kol böreği with exactly these quantities or proportions.
Another traditional Turkish pastry is Turkish su böreği. Although both pastries can contain white cheese, su böreği uses homemade egg dough with boiled inner layers, while kol böreği is distinguished by its long filled rolls and spiral or straight arrangement.
Why You’ll Love This Recipe
- Homemade pastry: The dough is mixed, rested, and rolled from scratch without packaged puff pastry.
- Beautiful presentation: Six long cheese-filled rolls form a golden spiral that can be sliced into generous wedges.
- Contrasting textures: A lightly crisp crust surrounds tender layers and savory cheese.
- Accessible ingredients: Flour, water, butter, olive oil, white cheese, and parsley are available in many countries.
- Detailed troubleshooting: The instructions explain how to handle resistant dough, avoid soggy filling, prevent tearing, and check the underside during baking.
- Versatile serving: Kol böreği can be served at breakfast, brunch, afternoon tea, or as part of a larger Turkish meal.
The shaping becomes manageable when divided into clear stages: preparing the dough, resting it, rolling the sheets, adding the filling, forming the rolls, and baking.
Turkish cuisine includes several other rolled pastries. For example, sigara böreği uses smaller pastry rolls that are commonly fried, rather than arranging long filled ropes into a large oven-baked spiral.
Ingredients
This recipe is designed for one large spiral börek in a 36 cm (approximately 14-inch) round metal baking tray and yields 12 portions.
For the Homemade Dough
- 600 g (approximately 5 US cups) all-purpose flour, preferably 10–12% protein
- 360 ml (approximately 1.52 US cups, or 1 1/2 US cups plus 1 teaspoon) lukewarm water
- 12 g (approximately 2 teaspoons) fine salt
- 20 ml (4 teaspoons) olive oil
For Rolling
- Approximately 40 g (1/3 US cup) additional all-purpose flour, used as needed
For the Cheese Filling
- 450 g (approximately 16 oz) well-drained Turkish white cheese, crumbled
- 35 g (approximately 1/2–3/4 US cup, depending on chopping and packing) fresh flat-leaf parsley, finely chopped and dried
For Layering and Baking
- 150 g (approximately 2/3 US cup) unsalted butter, melted
- 40 ml (2 tablespoons plus 2 teaspoons) olive oil, divided
Use 25 g melted butter on each of the six rolled dough sheets, for a total of 150 g. Use 15 ml olive oil for greasing the tray and the remaining 25 ml for brushing the assembled pastry.
Keep the 20 ml olive oil used in the dough separate from the additional 40 ml used for the tray and topping.
Ingredient Notes & International Substitutions
Flour: The Foundation of Stretchable Dough
Choose all-purpose flour with a moderate protein content of approximately 10–12%. It should develop enough gluten to stretch into thin sheets without becoming excessively tough.
British plain flour can work, although protein content varies by brand. Very soft, low-protein flour may tear more easily, while strong bread flour may require longer resting because of its greater elasticity.
Weighing the flour provides more consistent results than using cups. A tightly packed cup can contain substantially more flour than a loosely filled one.
Water Temperature and Dough Consistency
Lukewarm water helps hydrate the flour. Aim for water that feels comfortably warm to the touch rather than hot.
This is an unleavened dough, so the water is not intended to activate yeast. No yeast, baking powder, or proofing stage is required.
The recipe uses 360 ml water, equivalent to approximately 1.52 US cups. For practical measuring, use 1 1/2 US cups plus 1 teaspoon, or measure 360 ml directly for greater accuracy.
Different flours absorb different amounts of water. The specified quantity is a starting point, and small adjustments may be needed depending on the flour.
Olive Oil in the Dough
The 20 ml olive oil helps make the dough more workable and contributes tenderness. It is mixed directly into the dough along with the water.
A neutral vegetable oil may be substituted, although the flavor will be less pronounced.
Turkish Beyaz Peynir
Turkish beyaz peynir is a brined white cheese commonly used in breakfast dishes, salads, and savory pastries. For kol böreği, a firm variety that crumbles easily is preferable.
Drain the cheese thoroughly before preparing the filling. Cheese surrounded by excess brine can release moisture into the dough during baking.
If you enjoy cheese-filled Turkish pastries, Turkish cheese börek is another way to explore the combination of white cheese and pastry. The dough and shaping method may differ from the hand-rolled kol böreği prepared here.
Using Feta Outside Turkey
Firm feta is a practical substitute in the United States, United Kingdom, Canada, and Europe.
Feta can be more acidic or salty than some Turkish white cheeses. If needed, use 350 g drained feta with 100 g well-drained, firm ricotta instead of the 450 g Turkish cheese.
The ricotta produces a milder filling but can soften the texture. Avoid watery ricotta and do not add extra liquid to the filling.
Butter for Layer Separation
The melted butter coats each dough sheet before filling and rolling. This helps create separation between the thin dough surfaces and adds the rich flavor associated with homemade börek.
Use unsalted butter because the cheese already contributes salt. Ghee may replace the same weight of butter, but its flavor and moisture content differ.
Fresh Parsley
Flat-leaf parsley balances the richness of the cheese and butter. Wash it ahead of time and dry it thoroughly before chopping.
Wet parsley can contribute unnecessary moisture to the filling. Fresh dill may replace part of the parsley if you prefer its flavor.
Why Not Use Puff Pastry?
Commercial puff pastry is made by laminating fat between layers of dough. It rises and separates during baking, producing a characteristic flaky structure.
Hand-rolled kol böreği relies on thin sheets of homemade dough, brushed with fat and rolled around a filling. The dough, structure, and eating texture are different.
Although convenient puff pastry versions exist, they should not be presented as the only traditional preparation method.
What About Ready-Made Turkish Yufka?
Ready-made Turkish yufka is widely used for homemade börek. It is an appropriate starting point for a faster kol böreği variation, but it eliminates the hand-mixing and hand-rolling stages in this recipe.
Commercial phyllo, also called filo, may be thinner and more fragile than fresh Turkish yufka. It should not be substituted sheet for sheet without adapting the fat distribution, handling, and rolling technique.
Equipment
- Large mixing bowl
- Digital kitchen scale
- Measuring jug
- Rolling pin or long Turkish oklava
- Spacious, clean work surface
- 36 cm (14-inch) round metal baking tray with a raised edge
- Clean kitchen towels or reusable wrap
- Pastry brush
- Small saucepan for melting butter
- Bench scraper or sharp knife
- Flat spatula for checking the bottom
A long rolling pin is helpful when preparing thin, wide sheets. A conventional rolling pin can also be used if the dough is rotated regularly and the work surface is large enough.
A metal baking tray is recommended because it allows the underside of the pastry to brown efficiently. Glass and ceramic dishes may require different baking times.
Step by Step Instructions
Step 1: Mix the Dough
Place 600 g all-purpose flour and 12 g fine salt in a large mixing bowl. Mix briefly to distribute the salt.
Add 360 ml lukewarm water and 20 ml olive oil. Stir with a spoon or your hand until the flour begins to form a shaggy mass.
Transfer the mixture to a clean work surface and bring the pieces together into one dough ball.
The dough should feel soft but not wet. It should hold together without spreading like a thick batter or clinging heavily to your hands.
If dry flour remains after several minutes of kneading, add water in 5 ml increments. If the dough is excessively sticky, dust the surface with a small quantity of the reserved rolling flour.
Avoid adding large amounts of extra flour, which can make the dough difficult to roll thinly later.
Step 2: Knead Until Smooth and Elastic
Knead the dough for approximately 8–10 minutes, pushing it forward with the heel of your hand, folding it back, and rotating it regularly.
The surface should gradually become smoother, with fewer dry cracks. A properly kneaded dough should feel supple and elastic enough to stretch gently without immediately tearing.
If the dough feels unusually tight, cover it for 5 minutes before finishing the kneading. Resting helps the gluten relax and makes the dough easier to handle.
Do not attempt to stretch the dough to full pastry-sheet thickness at this stage. That happens after the resting period.
Step 3: Rest the Dough for 45 Minutes
Shape the dough into a smooth ball and cover it tightly with reusable wrap, an inverted bowl, or a clean, slightly damp kitchen towel.
Leave it at room temperature for 45 minutes.
Resting allows the flour to hydrate and the gluten to relax. This is essential for producing thin sheets without excessive shrinking.
If the dough is left uncovered, its surface may dry and form a skin. Dry patches can crack when the dough is rolled.
Step 4: Divide the Dough Into Six Portions
Weigh the rested dough and divide it into six equal portions, approximately 165 g each before any rolling flour is added.
Shape the portions into smooth balls and arrange them on a lightly floured surface. Cover them and rest for another 15 minutes.
These six balls will become six thin dough sheets and eventually six cheese-filled rolls, each approximately 40 cm long.
Using equal portions helps maintain consistent dough thickness and produces rolls that are easier to arrange in a spiral.
Step 5: Prepare the Cheese Filling
Place 450 g well-drained, crumbled Turkish white cheese in a bowl. Add 35 g finely chopped, dry flat-leaf parsley.
Mix gently with a fork until the herbs are distributed evenly throughout the cheese.
The filling should remain crumbly rather than turning into a wet paste. If moisture collects at the bottom of the bowl, drain it before using.
Divide the filling by weight or as evenly as possible into six portions of approximately 81 g each. Reserve one portion for every dough sheet.
Do not add extra salt until you have tasted the cheese. Most brined white cheeses are already adequately seasoned.
Step 6: Prepare the Butter and Baking Tray
Melt 150 g unsalted butter gently over low heat. Remove it from the heat before it browns.
Divide the melted butter into six equal portions of 25 g, one for each dough sheet.
Grease the bottom and sides of the 36 cm round baking tray with 15 ml olive oil. Keep the remaining 25 ml olive oil for brushing the assembled pastry before baking.
Organizing the butter and oil before rolling prevents uneven distribution and helps ensure that all six sheets receive the same amount.
Step 7: Roll the First Dough Sheet
Place one rested dough ball on a lightly floured work surface. Flatten it gently, then begin rolling from the center toward the edges.
Rotate the dough frequently to maintain a fairly even shape. Continue rolling until you have a thin sheet approximately 40 x 50 cm (16 x 20 inches), allowing for some variation in its shape.
The sheet should be thin enough to look slightly translucent in places, yet strong enough to lift and fold without immediately tearing.
A practical thickness target is approximately 1 mm or slightly less. Do not sacrifice strength simply to reach an exact numerical measurement.
If the dough pulls back after every movement of the rolling pin, cover it for another 10 minutes. Forcing resistant dough usually creates thick areas or tears.
Use additional flour sparingly. Brush away obvious excess from the surface before adding butter.
Important shaping detail: Keep the 40 cm edge closest to you when you begin filling and rolling. You will roll across the 50 cm dimension, producing a finished rope approximately 40 cm long rather than 50 cm long.
Step 8: Butter the Sheet Evenly
Spread one 25 g portion of melted butter over the entire rolled sheet using a pastry brush.
Work from the center outward, including the corners and edges. The coating should be thin and reasonably even, without large pools of butter.
The butter provides flavor and helps the dough layers separate during baking.
If the butter begins to solidify, warm it gently. Avoid pouring very hot butter onto the dough because it can make handling the delicate sheet more difficult.
Step 9: Add the Cheese Filling
Take one approximately 81 g portion of cheese filling and distribute it in a narrow line along the 40 cm edge closest to you.
Leave approximately 2 cm of clear dough at both ends of this edge to help contain the filling when rolling.
Keep the cheese line relatively even. Large mounds create thick spots that can tear the dough or make the spiral bake unevenly.
Do not scatter the filling across the entire sheet. Concentrating it along the starting edge makes it possible to create a long, evenly filled pastry rope with multiple thin dough layers surrounding the cheese.
The filling should extend across most of the 40 cm edge, while the remaining 50 cm depth of dough provides the material that wraps around it.
Step 10: Roll Into a Long Pastry Rope
Starting from the filled 40 cm edge, lift the dough gently and roll it away from you across the 50 cm dimension.
Continue rolling with light, even pressure until the entire sheet is wrapped around the filling.
The finished rope should be approximately 40 cm (16 inches) long. Aim for a relatively even diameter of approximately 2.5–3 cm (1–1.2 inches), although the exact thickness depends on how thinly the dough has been rolled.
Do not squeeze or stretch the rope simply to force it to reach these measurements. An evenly filled, flexible roll is more important than an exact diameter.
If the rope becomes noticeably thicker than 3 cm, avoid compressing it tightly. Check whether the filling has collected in one section or whether the dough was rolled too thickly. Redistribute the filling gently if the roll is still open; otherwise, allow slightly more room during shaping and check the inner dough carefully during baking.
Pinch the two ends gently to help contain the cheese. If a small tear appears, cover it with a nearby flap of dough rather than stretching the damaged area.
Step 11: Shape the First Spiral
Transfer the first rope carefully to the prepared 36 cm round baking tray.
Starting near the center, curve it into a loose spiral. Avoid forcing a sharp bend that could tear the outer dough.
Leave a little space between adjacent sections rather than pressing the coil into a compact mass. The dough needs room to expand slightly during baking.
If the rope resists bending, allow it to rest briefly before adjusting the curve.
A rope approximately 40 cm long and 2.5–3 cm thick is easier to arrange in the specified tray than a thicker, 50 cm roll. The objective is to create a gently curved starting coil, not to pack as much dough as possible into the center.
Step 12: Prepare and Add the Remaining Five Rolls
Repeat the rolling, buttering, filling, and shaping process with the remaining five dough balls.
Each dough ball becomes one sheet approximately 40 x 50 cm. Each sheet receives 25 g melted butter and approximately 81 g cheese filling along its 40 cm edge, before being rolled across the 50 cm dimension.
This produces six rolls of approximately 40 cm each, or around 240 cm of total filled pastry length before any minor stretching or shortening during handling.
Place the beginning of the second rope near the end of the first and continue the spiral outward. Add the remaining ropes in the same way, maintaining loose, even curves.
The finished börek should form one large spiral made from six individual rolls, with a little space between neighboring coils and the outer edge of the tray.
Do not overlap the ropes vertically or force excess dough into the center. If the spiral approaches the tray edge before the final roll is fully placed, check the spacing first and gently reposition the coils while the dough is still flexible.
If the actual rolls are substantially thicker than the suggested 2.5–3 cm, a larger tray may be necessary. Do not compress thick, filled rolls to make them fit a smaller pan.
Check that the filling is mostly enclosed and the pastry ropes have a fairly consistent thickness before proceeding.
Step 13: Brush the Top
Using a pastry brush, coat the assembled spiral evenly with the reserved 25 ml olive oil.
Cover the upper surface and exposed sides without leaving large pools of oil in the spaces between the rolls.
This helps the pastry develop an evenly browned exterior.
If any sections have opened slightly, tuck the loose dough into place before baking. Do not press the spiral flat.
Step 14: Preheat the Oven
Preheat the oven to 190°C (375°F) using conventional top-and-bottom heat.
For a fan-assisted oven, begin at approximately 170°C (340°F). Fan ovens differ considerably, so use the pastry’s browning and internal texture as guides.
Position a rack in the lower-middle section of the oven. This placement encourages adequate browning underneath the pastry while reducing the risk of the top darkening too quickly.
Step 15: Bake Until the Crust and Bottom Are Fully Cooked
Place the tray in the preheated oven and bake for approximately 45–55 minutes, with 50 minutes as the working target.
The pastry should become deeply golden across the top and around the outer edges. Its surface should feel firm and lightly crisp rather than pale or doughy.
Rotate the tray once during baking if your oven has noticeable hot spots.
After approximately 45 minutes, carefully lift a section near the outer edge with a thin spatula. The underside should be golden and set, without sticky raw dough.
If the top looks ready but the bottom remains pale, move the tray one rack lower and continue baking in 5-minute increments. Cover the top loosely with foil if necessary to prevent excessive browning.
Do not rely on color alone. A thick pastry rope may appear browned externally while its innermost dough layers remain undercooked.
Check a small opening near the side of the spiral. The dough surrounding the cheese should be opaque, tender, and fully set rather than wet or pasty.
The suggested 45–55-minute range assumes the rolls are relatively thin and evenly shaped. Thicker rolls, a crowded tray, or a different baking dish may require additional cooking time.
Step 16: Rest Before Serving
Remove the baking tray from the oven and place it on a heatproof surface.
Allow the kol böreği to rest for 15 minutes before cutting.
The short rest helps the filling settle and makes the pastry easier to portion without pulling the delicate layers apart.
Use a sharp knife to cut the spiral into 12 portions, following natural sections of the rolls where convenient.
Serve warm, when the outside is lightly crisp and the cheese-filled interior remains tender.
Expert Tips
Work With Relaxed Dough
Good kol böreği depends on dough that can be rolled thinly without excessive resistance. If the dough shrinks repeatedly, additional resting is usually more useful than pushing harder with the rolling pin.
Avoid Excess Rolling Flour
Too much loose flour can become trapped between layers and produce dry, powdery patches after baking. Dust the work surface lightly and brush off visible excess before applying butter.
Keep the Filling Dry
Well-drained cheese is essential. If using ricotta or another soft cheese, let it drain before combining it with the other ingredients.
Do not add milk, cream, or water to make the filling spread more easily. It should remain crumbly rather than wet.
Control Roll Length and Thickness
For this 36 cm round tray, roll the dough from its 40 cm edge, not its 50 cm edge. This produces shorter ropes that can be arranged into a more manageable spiral.
Keep the filling evenly distributed and aim for rolls around 2.5–3 cm thick. Thick, compact rolls may remain undercooked near the filling even when the exterior looks ready.
Do Not Pack the Spiral Too Tightly
Pressing the ropes together into one dense mass can restrict heat from reaching the inner sections. A gently arranged spiral gives the dough more room to expand and brown.
If the rolls do not fit without excessive pressure, use a larger tray rather than stacking them on top of one another.
Use a Metal Baking Tray
A metal pan is particularly useful when baking a large filled spiral because the bottom requires sufficient heat.
Glass or ceramic dishes behave differently and may produce a pale underside even when the top appears ready.
Check the Dough Near the Filling
The center of each rope contains multiple dough layers surrounding cheese. If the exterior is browned but the inner dough looks sticky, the pastry needs more baking time.
Reduce the risk of this problem by rolling thin sheets, distributing the cheese evenly, and avoiding overly thick pastry ropes.
Regional Variations
Kol böreği can be prepared with different fillings and arranged in several shapes. These variations should be treated as separate preparations rather than mixed into the main cheese recipe without adjustments.
Spinach Kol Böreği
Spinach is a popular alternative to cheese or can be combined with it. Wash the spinach thoroughly, cook or wilt it as appropriate for the chosen recipe, and squeeze out excess liquid before using.
Wet spinach can release substantial moisture during baking, particularly when enclosed in long pastry rolls.
Potato Kol Böreği
Cooked, mashed potatoes can be seasoned with black pepper, paprika, and gently cooked onion.
Allow the filling to cool before adding it to the dough. Hot filling can soften delicate sheets and make rolling difficult.
Minced Meat Kol Böreği
Seasoned minced beef or lamb is another traditional filling option. Cook the meat thoroughly with onion, then allow the mixture to cool and drain excess fat or liquid before assembly.
The raw dough should not be filled with a hot, watery meat mixture. A separate meat-filling recipe should account for seasoning and cooking requirements.
Straight Kol Böreği
Some preparations arrange the filled rolls in long, parallel rows rather than one large spiral.
This approach highlights the pastry’s elongated form and may be convenient in rectangular baking trays. The present recipe uses a round spiral arrangement, so the tray and shaping instructions are designed specifically for that format.
Ready-Made Yufka Versions
Ready-made Turkish yufka can significantly shorten preparation time. However, its thickness and flexibility differ from freshly rolled dough, and the quantity of butter may need adjustment.
For this reason, packaged yufka is not substituted directly into the main formula.
Common Mistakes
1. Skipping the Dough Rest
Dough that has not relaxed tends to shrink when rolled and is more likely to develop uneven thickness. Follow the resting periods and add extra time if necessary.
2. Rolling the Dough Too Thick
Thick sheets create heavy pastry ropes that may brown outside while remaining undercooked near the filling.
Roll each sheet evenly and aim for a finished rope diameter of approximately 2.5–3 cm.
3. Rolling From the Wrong Edge
Starting from the 50 cm edge of a 40 x 50 cm sheet produces a longer rope that is harder to fit into the specified round tray.
Arrange the cheese along the 40 cm edge and roll across the 50 cm dimension to produce a rope approximately 40 cm long.
4. Using Very Wet Cheese
Excess moisture can collect inside the pastry and soften the dough. Drain the cheese thoroughly and dry the parsley before mixing.
5. Overfilling the Rolls
Too much filling makes the ropes difficult to close and can cause tearing or leakage. Divide the filling into six equal portions and distribute it evenly.
6. Rolling Too Tightly
A very compact roll creates dense inner layers and can squeeze cheese through weak areas of the dough.
Use gentle, steady pressure instead of compressing the filling.
7. Overcrowding the Tray
Tightly packed coils restrict expansion and can slow cooking between the rolls. Arrange the spiral loosely without stacking the dough vertically.
8. Uneven Fat Distribution
Large pools of butter may leave sections greasy, while dry areas can stick together. Brush each sheet evenly with its measured 25 g portion.
9. Underbaking the Bottom
A golden top is not proof that the underside or inner dough layers are fully cooked. Lift an outer edge and inspect the base before removing the tray.
10. Cutting Immediately
Cutting directly from the oven can pull apart the soft internal layers. Rest the börek for 15 minutes before serving.
Serving Suggestions
For a Turkish Breakfast
Serve warm wedges with sliced tomatoes, cucumbers, olives, and Turkish tea. The fresh vegetables balance the richness of the pastry.
For Brunch
Pair kol böreği with a simple green salad dressed with lemon juice and olive oil. The acidity provides contrast to the buttery cheese filling.
With Ayran
Cold ayran, a lightly salted yogurt drink, is a refreshing accompaniment to savory Turkish pastries.
For Afternoon Tea
Cut the spiral into smaller portions and serve with freshly brewed tea. This is particularly convenient when several other savory dishes are being offered.
For a Turkish Pastry Table
Kol böreği works alongside other Turkish pastries, although smaller portions are preferable when several dishes are served together. For another savory option, consider paçanga böreği, which offers a different filling and pastry preparation.
Storage & Reheating
Refrigeration
Because the filling contains cheese, refrigerate leftovers promptly. Do not leave cooked kol böreği at room temperature for more than 2 hours.
Store covered or in an airtight container at 4°C (40°F) or below and consume within 3–4 days.
Freezing
Fully baked and cooled portions can be frozen for convenient storage.
Wrap individual wedges tightly, place them in freezer-safe containers, and store at -18°C (0°F) or below.
For best texture and flavor, use within approximately 2 months. Freezing may soften the inner layers slightly after reheating.
Reheating Refrigerated Portions
Preheat the oven to 170°C (340°F). Place the portions on a baking tray and warm for approximately 10–15 minutes, depending on their thickness.
If the surface browns too quickly, cover loosely with foil. Remove the foil near the end if the pastry needs to regain crispness.
Heat leftovers thoroughly. A center temperature of 74°C (165°F) is a conservative food-safety target.
Reheating Frozen Portions
Thaw frozen pieces overnight in the refrigerator when possible. Reheat as above, allowing additional time if needed.
Small portions may also be reheated directly from frozen at 170°C (340°F) for approximately 20–30 minutes, checking that the center becomes thoroughly hot.
Microwave Reheating
A microwave can warm kol böreği quickly, but it usually softens the outer crust. An oven or toaster oven is preferable when crispness matters.
Frequently Asked Questions
1. What is traditional Turkish kol böreği?
Kol böreği is a Turkish savory pastry made by filling thin dough, rolling it into long ropes, and arranging those ropes in a tray. Depending on the style, they may be placed in straight rows or formed into a large spiral. Cheese, spinach, potatoes, and seasoned minced meat are common fillings.
2. Is kol böreği the same as spiral börek?
Spiral shaping is one common presentation of kol böreği, but the name is not limited to that shape. Traditional kol böreği can also be arranged as long, relatively straight rolls. The name refers to the pastry’s elongated form, while the spiral describes one way of arranging those rolls.
3. Can I use store-bought puff pastry?
Yes, for a shortcut pastry, but it will not reproduce the texture of this hand-rolled dough recipe. Puff pastry is laminated and rises into flaky layers during baking. Traditional homemade kol böreği can be prepared from thin, manually rolled dough coated with fat. The two approaches require different handling and baking methods.
4. How thin should kol böreği dough be?
A useful target is approximately 1 mm or slightly less, provided the dough remains strong enough to handle. The sheet should be thin and flexible without large, thick patches. If it repeatedly shrinks or tears, allow additional resting time rather than forcing it.
5. Why does my kol böreği dough keep shrinking?
Shrinking usually indicates that the gluten is still tight after kneading. Cover the dough and allow another 10 minutes of rest before continuing. Flour with a high protein content may also produce more resistant dough, so selecting moderate-protein flour can make rolling easier.
6. What cheese can I use outside Turkey?
Well-drained feta is a practical alternative to Turkish beyaz peynir. A mild combination of 350 g drained feta and 100 g firm, drained ricotta can replace the 450 g Turkish cheese in this recipe. The filling will be somewhat softer, so avoid using loose or watery ricotta.
7. Why does my kol böreği become soggy?
Sogginess can result from excess moisture in the cheese or herbs, thick dough, tightly packed rolls, or insufficient baking. Drain the cheese thoroughly, dry the parsley, avoid overfilling, and inspect the bottom crust before removing the pastry from the oven.
8. How do I stop the filling from leaking?
Use the specified amount of filling, distribute it evenly, and leave a little space at the ends of each dough sheet. Roll with gentle pressure and pinch the ends closed. Small leaks are not necessarily a problem, but large tears may cause the filling to escape and burn on the baking tray.
9. Can I make kol böreği ahead of time?
Yes. Fully baking the pastry in advance is a convenient approach. Cool it promptly, refrigerate it, and reheat before serving. For the most predictable result with fresh dough, complete the rolling and assembly in one session rather than storing delicate, stretched sheets for an extended period.
10. Can I freeze kol böreği?
Yes. Freeze fully baked and cooled portions in airtight wrapping. For best quality, use within approximately 2 months. Thaw overnight in the refrigerator before reheating, or warm smaller pieces directly from frozen until thoroughly hot.
11. How do I know when the bottom is fully baked?
Carefully lift an outer section with a flat spatula. The underside should be golden, firm, and dry rather than pale or sticky. Also check that the dough surrounding the cheese is set and no longer pasty. If the top is already browned, cover it loosely with foil while continuing to bake the bottom.
12. What is the difference between kol böreği and su böreği?
Kol böreği is identified by its long, filled rolls, which can be arranged straight or in a spiral. Traditional su böreği is made from homemade egg dough, with layers commonly boiled briefly before assembly. Their dough preparation, construction, and finished textures are different, although both belong to the wider Turkish börek tradition.
Conclusion
Traditional Turkish kol böreği is built around a few essential skills: allowing homemade dough to relax, rolling thin sheets, distributing the filling evenly, and baking the assembled rolls until both the top and bottom are fully cooked.
Once you understand the shaping technique, the same general pastry style can inspire different fillings and presentations. Serve the cheese-filled spiral warm, with fresh vegetables or Turkish tea, and explore more Turkish pastry recipes to discover other traditional doughs and fillings.

Traditional Turkish Kol Böreği (Homemade Cheese Spiral Borek)
Ingredients
- Group Amount Ingredient
- Dough 600 g All-purpose flour preferably 10–12% protein
- Dough 360 ml Lukewarm water
- Dough 12 g Fine salt
- Dough 20 ml Olive oil
- Rolling Up to 40 g Additional all-purpose flour as needed
- Filling 450 g Well-drained Turkish white cheese crumbled
- Filling 35 g Fresh flat-leaf parsley finely chopped and dried
- Layering 150 g Unsalted butter melted
- Tray and topping 40 ml Olive oil
360 ml water ≈ 1.52 US cups, approximately 1½ US cups + 1 teaspoon. For accuracy, use the metric quantity. Olive oil: 20 ml in dough + 15 ml for tray + 25 ml for topping = 60 ml total.
Instructions
- Prepare the dough
- Combine 600 g flour and 12 g salt in a large bowl. Add 360 ml lukewarm water and 20 ml olive oil. Mix until the ingredients form a shaggy dough, then knead for 8–10 minutes until smooth, soft, and elastic. If necessary, adjust with water in 5 ml increments or use a little reserved flour to reduce stickiness.
- First dough rest
- Cover the dough tightly and rest at room temperature for 45 minutes. This allows the gluten to relax, making it easier to roll thinly without excessive shrinking.
- Divide and rest again
- Divide the dough into six equal portions, approximately 165 g each before rolling flour is added. Shape into balls, cover, and rest for another 15 minutes.
- Prepare the cheese filling
- Combine 450 g drained, crumbled Turkish white cheese with 35 g finely chopped, thoroughly dried parsley. Divide into six equal portions of approximately 81 g. The filling should be crumbly, not watery.
- Prepare the butter and tray
- Melt 150 g unsalted butter without browning it, and divide into six portions of 25 g each. Grease the bottom and sides of a 36 cm round metal tray with 15 ml olive oil. Reserve the remaining 25 ml olive oil for brushing the assembled pastry.
- Roll the first sheet
- On a lightly floured surface, roll one dough ball into a thin sheet approximately 40 × 50 cm (16 × 20 inches), targeting approximately 1 mm thickness or slightly less. The dough should be flexible and strong enough to handle. If it shrinks, cover and rest for another 10 minutes.
- Butter the dough
- Brush the entire surface of the rolled sheet evenly with 25 g melted butter. Avoid leaving large pools of butter.
- Distribute the filling
- Position the sheet with a 40 cm edge closest to you. Arrange one-sixth of the filling in a narrow line along this edge, leaving approximately 2 cm clear at each end.
- Form the pastry rope
- Roll the sheet away from you across its 50 cm dimension, beginning at the filled 40 cm edge. Form a rope approximately 40 cm long, aiming for a diameter of 2.5–3 cm. Close the ends gently without squeezing the filling.
- Start the spiral
- Transfer the first rope to the center of the prepared tray and bend it into a gentle spiral. Avoid sharply bending, stretching, or compressing the dough.
- Complete the spiral
- Repeat with the remaining five portions. Each sheet receives 25 g butter and approximately 81 g filling. Arrange all six approximately 40 cm ropes outward into a continuous spiral, keeping a little space between adjacent coils and avoiding vertical overlap. If the rolls cannot fit without compression, use a larger tray.
- Brush the surface
- Brush the assembled spiral evenly with the reserved 25 ml olive oil, including its exposed sides. Avoid pooling oil between the rolls.
- Bake until fully cooked
- Preheat the oven to 190°C (375°F) with conventional top-and-bottom heat, or begin at approximately 170°C (340°F) for a fan-assisted oven. Bake on a lower-middle rack for approximately 45–55 minutes, with 50 minutes as the working target. Inspect the underside and the dough around the filling. Both should be fully cooked, not pale, wet, or pasty. Extend the baking time if needed, covering the top loosely with foil if it browns too quickly.
- Rest and serve
- Remove from the oven and rest for 15 minutes. Cut into 12 portions and serve warm.
Notes
- This version uses homemade, yeast-free dough rather than packaged puff pastry.
- Each dough sheet is approximately 40 × 50 cm; roll from the 40 cm edge across the 50 cm dimension to create an approximately 40 cm rope.
- The target rope diameter is 2.5–3 cm, not an exact dimension to achieve by compressing the dough.
- Dough elasticity and flour absorption vary. Rest resistant dough before attempting to roll it thinner.
- Drain the cheese thoroughly. For a milder alternative, replace 450 g Turkish white cheese with 350 g drained feta and 100 g firm, drained ricotta.
- Refrigerate cooked leftovers promptly and consume within 3–4 days, or freeze fully baked portions for best quality within approximately two months.
- The specific home-kitchen quantities, spiral arrangement and timings have not been independently kitchen-tested.